How to unlock the techno powers of Logic Pro X 10.5
Apple’s flagship DAW has long been a favorite tool of techno producers. But the latest release, 10.5, is one of the most significant in years. Let’s cut straight to some of the best stuff you can use right away. Even users of other DAWs may find some tools that are indispensable.
Make a drum machine
First, let’s build our instrumentation – our virtual studio. We can do that in a way that borrows some of the immediacy of hardware rigs, but with the flexibility of software.
10.5’s new Drum Machine Designer is a good place to start. It now lets you assemble your own custom kits from samples, Logic instruments, and plug-ins -- in any combination. That makes it a fantastic tool for original sound design.
Create a new project. (File > New Document or choose an Empty Project in the dialog that appears as you load Logic.) Choose Software Instrument > Instrument > Empty Channel Strip, and click Create.

Now we want to build our own Drum Machine. The easiest to do this with the Library open (Y key) – even if you don’t intend to use a preset. There are a few easy ways to get started:
- Build one completely from scratch. In the Channel Strip, select Instrument > Drum Machine Designer. Or from the Library, choose Electronic Drums > Empty Kit. This is especially useful for a Drum Machine made mostly for playing around with samples.
- Choose a standard drum kit. Even if you replace all the sounds, a couple of the drum machine templates make a nice layout for a standard drum kit. 808 Flex might seem the obvious choice for techno, but LinnDrum is better in that it’s more generic in its setup (even if you don’t plan to emulate the LinnDrum).
- Select the new Drum Synth Kit. The Drum Synth Kit uses all synthesized drum sounds for each part – meaning you can tweak and tune each freely. There are new engines in Logic Pro X 10.5 covering sub/kick, snares, rim, clap, hat, crash, ride, toms, shakers, and various percussion, each with dedicated engines and lots of parameters for sound designers.
Sample-based Drum Machines. Let’s start by exploring the LinnDrum preset. Load it from the Browser (Electronic Drums > LinnDrum Kit), then double-click to bring up the Drum Kit Designer window.

From the main view or by bringing up the Smart Controls view (hit the B key), you’ll see some macro controls for the whole kit and its channel effects. These are also controllable from an iPad – useful for jamming.

Click on any part, and you’ll see an instance of the new Logic 10.5 Quick Sampler (Q-Sampler). Each sound here is loaded as a one-shot. You’ll find some powerful features from the sampler, too, including two LFOs for modulation (with a matrix), a selectable filter, more. These features will look familiar if you’ve played with Logic’s powerful Alchemy synth or “Phat” effects. You can use them with the preset samples – or load in your own one-shots – to make some creative kits.

Drum Synth Drum Machines. Logic 10.5 now includes an excellent Drum Synth with engines for all the essentials (kicks, hats, claps, toms, percussion, etc.) It’s effectively the successor to the confusing, alien-looking UltraBeat in old versions of Logic – and it’s both easier-to-use and better-sounding.
The Drum Synths are eminently tweakable since they’re synthesis-based, not sample-based. Plus if you’ve got an iPad, you can do that tweaking with your fingers, not your mouse.
You can load the Drum Synth Kit to instantiate a bunch of these models at once (Browser > Electronic Drums > Drum Synth Kit).

There’s a ton of depth here, in that there are multiple models for each sound. The Drum Synth is grouped into different types of models (Kicks, Snares and Claps, Percussion, Hats and Cymbals), and then each of those groups has its own models with unique sounds and parameters. Apple’s done a lot to introduce some depth and choice to these models, as well, even compared to competing offerings in Native Instruments Maschine and Ableton Live Suite.
FREE Sample pack: 542 Techno Loops & Oneshots

Download in here: Free Sample Packs
Custom Drum Machines. You can also build up your own kits and mix and match approaches. That includes working with other Logic instruments, plug-in support (in case you prefer your favorite AU for a kick, for instance), and importing your own samples.
Open the Empty Kit presets (Browser > Electronic Drums > Empty Kit). Note that the standard MIDI note mappings for drum parts are displayed on each pad space, too. This preset is strictly for people who love customization, as you’ll need to title and choose icons and color coding for each pad manually. For that reason, you may want to consider modifying an existing preset like the LinnDrum.
Hover over a pad and choose (+) to add a part. For samples, drag an audio sample to the pad – from the Finder or elsewhere in Logic. You’ll find customization options by hovering over each pad, too, or selecting the cog wheel menu at the lower right.
![]()
As you add each part, Logic neatly organizes each into a collapsible Track Stack containing all the parts. Each part has its own sub-track, which is useful for routing individual effects (and for triggering parts, too).
To add custom instruments and effects per-pad – Logic’s FM synth for a cymbal, an AU plug-in for a kick – expand the Track Stack and you can select your favorite devices in the Channel Strip.

I’ve added a couple of Drum Synth instances (kick, hat) to get started, and because this is Logic, an instance of Sculpture, the physical modeling instrument. (Sculpture is now many years old, but it doesn’t matter -- it still feels futuristic, and there’s nothing else that sounds or works quite like it.)
Ableton Live users: Yes, Drum Racks in Live are roughly equivalent to Drum Machine Designer in Logic. But Logic’s Track Stacks make for better organization and easier routing in the main mix. The basic concept is the same, but adapted to each DAW’s respective workflow.
Create step sequences
Logic now has a powerful Step Sequencer view for editing patterns. These work like a hardware step sequencer, but function by editing Regions in your project. That means you can also use them to generate elements for song structure, in both the traditional linear Tracks Area editor and the new Ableton Live-style Live Loops grid. (And they’re still in addition to the various real-time MIDI FX processors you can add to a MIDI track.) They use a specialized type of Region – the new Pattern Region – but otherwise are the equivalent of opening up a Region in a Piano Roll or Score editor.
To use the Step Sequencer view, select a MIDI or instrument track, open the Editors (E key) and select the Step Sequencer tab. For instance, if you select one of the Drum Kits we just created, at the top level of the Track Stack, you’ll see rows for each part. (You can also right-click in the Workspace alongside a track and choose Create Pattern Region.)

Once you do that, you’ll see a Pattern Region appears in the main track view. It helps to set the playback loop to that region, because then you can hit play and just loop the Pattern Region as you edit.
You can start out by quickly punching in steps – four on the floor kicks, for example. But there’s more tucked into this interface that sets Logic’s tool apart from some competing tools – and lets you create pretty sophisticated polyrhythms and other details.
Pattern Settings.
Length. Pattern Regions can be set to 12, 16, 24, 32, 36, 48, or 64 steps. Since these are regions, you can also chain them together if you want something longer.
Step Rate. The overall pattern and each row each can be set to their own rate – like a clock division. That includes all the basic divisions plus dotted and triplet rhythms. Since each part can run at its own rate, you can create polymetric relationships.
Playback Mode (Direction). You can also set direction per row or for the whole pattern – forward, backward, ping-pong, and random.
Rotate Steps. You can “rotate” the overall pattern or individual rows – basically, this shifts the steps left or right for additional variations.
All of this editing has a dual purpose – if you duplicate the region, in either the linear arrangement or Live Loops, you can easily create variations.
Inside each row, you get still more options.

Subrow Editing. If you click the disclosure triangle for a row, you can add subrows for controlling various parameters:
- Velocity
- Gate
- Tie
- Note (pitch)
- Octave
- Loop start/end
- Note repeat
- Chance
- Start offset
- Step rate
- Skip step
Loop start/end is especially useful. For instance, if you don’t want your pattern to be an even increment of 16 or 24 steps, you can adjust to a different value. You can set different rows to different lengths, which can produce still more polyrhythms – like 9 against 16 on your hats part.

You can also add probabilities per note with Chance. You can even right-click a row with any of these parameters to randomize its values – or clear those settings if something got too weird.
Hardware drum machine users will recognize these settings as parameter locks or p-locks, but in software you have still more options and visual feedback.
Here are some easy ways to create more complex rhythms. Use loop length as seen here to create rows of different lengths. Try rotating patterns left and right, too – the squares with arrows next to them, next to direction.
More editing functions. Explore the Edit, Functions, and View menus for still more functions and shortcuts.
Inspector (Show/Hide Local Inspector or opt-shift-I) brings up per row settings.
Pattern Browser (Show/Hide Pattern Browser or opt-shift-B) has a bunch of templates and also gives you a convenient place to store your own user patterns.
Play with loops and arrangements
Logic 10.5’s Live Looper finally brings non-linear arrangement to Logic. That is, it does what Ableton’s Session View does – but with a Logic workflow. In fact, as you dig in, you’ll find more features that are specific to Logic. Here we’ll just get a brief overview.
Show the Live Loops Grid, and you can drag Regions – including Pattern Regions you’ve created in Step Sequencer view - from the linear arrangement into their own Loop slots. This lets you work with a workflow you might be less likely to try in Live – starting with a fixed arrangement, then mixing it up on the grid, rather than the other way around.
Beginning with those patterns, we can make some variations. Drag and drop Loops into adjacent slots, and change the patterns or remove parts. Now try triggering them to create some rudimentary song structure or breaks.
 Once you have variations you like, you can build an arrangement either step-by-step or live.
Here’s the nice thing – the transition between your linear arrangement and the experimental Live Loop triggering you’re doing is really clear, especially as you see them side by side. As you start messing around with Live Loops, you’ll see regions are grayed out in the track area. Between these two views, there’s a toggle called the Track Activation Button. Click it to revert to the arrangement – click it again to go back to triggering regions.
So when you’re ready to commit to an arrangement, choose Enable Performance Recording (ctrl P for performance). Then, hit the Record button at the top. Now, as you play, your loops will be written as Regions. That’s familiar again to Live users, but it means you now have access to all Logic’s editing functions.

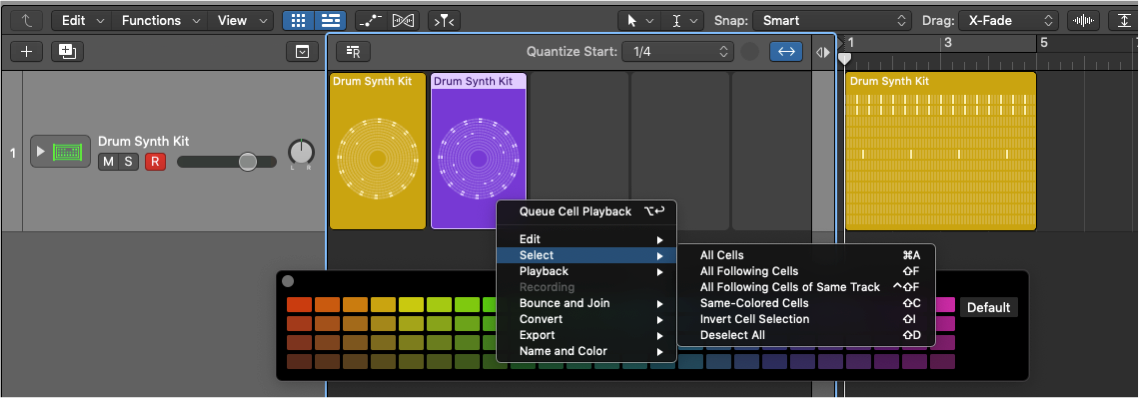
There are some other tricks. You can queue several scenes at once – which also is useful if you want to jam over top of them. (Right-click and choose Queue Scene.)
You can right-click on a cell or cells in Live Looper and choose Bounce and Join > Bounce cells in place – which records everything, including plug-ins and automation, to audio, quickly.
Cells have settings for reverse and speed, too.
We were playing with patterns – if you want fully-editable MIDI, choose Convert to MIDI cell.
You’ll also find various editing and export settings that make the Live Looper a useful way of batching together lots of odds and ends, patterns and audio, and exporting them at once. That means that you might do well not just to think of Live Looper as an Ableton Live wannabe, but a way to batch-process lots of little sketches or materials. So for instance, it’s really useful editing and gathering audio to export to hardware samplers, or to chop up an arrangement and prepare it for use as a live set.
What’s next
This just covers one area of new stuff in Logic 10.5. Next time, we’ll have a look at the powerful sampling workflows now built into Logic – which can also work wonders in combination with your outboard hardware.
Until then, you’ve got a ton of tools to give you some inspiration for new tracks.
Peter Kirn is a composer and producer based in Berlin and editor of CDM; he has been using Logic for two decades and reviewed key editions of the software for Macworld and Keyboard Magazines. See his production guides to Ableton Live arrangement and effects and FL Studio, here on Riemann Kollektion.
Subscribe to our Youtube channel for tutorials and free sample packs!
Related articles
Tutorial: Unlock hidden sound tricks in Ableton Live 10’s effects
Tutorial: Super Fast Arrangement in Ableton Live 10